In today’s episode of Peter Stays Relevant, we are exploring workflow automation for FPGA development. Exciting stuff, I know. More specifically, I will be demonstrating a Continuous Integration/Continuous Delivery (CI/CD) implementation targeting the Vivado development environment. I’ll also be covering all the mistakes I made as I untangle the complicated relationship between the Github Action Runner, Docker, and Windows Subsystem for Linux (WSL). More on that in a bit, but let’s first introduce CI/CD.
Note: The reference material for this post is located on my Vivado CI/CD repository.
Now don’t get it twisted, I’m a hardware engineer, and at NASA we tend to be a little touchy-feely about being categorized as folks who write software. Field-Programmable Gate Array (FPGA) development is akin to circuit design and does not subscribe to traditional software engineering. However, I also have a degree in computer science and can look past our systemic differences with my software-oriented colleagues to take advantage of some valuable software practices. One subject in particular that I’ve taken much inspiration from is in the matter of workflows and how to best optimize and automate.
To help me illustrate some confusing concepts is my wonderful girlfriend Maddy, a professional actor in the Cleveland area.
M: “Bonjour, bonjour, what do you mean by workflow?”
P: “A workflow defines the steps you take from writing code (in our case hardware description language (HDL)) to building a script, executable, bitfile, program, etc., to testing the code, and finally to deploying the code.”
M: “Kind of like writing a play, rehearsing the play, building the set, and then putting on the show!”
P: “Precisely!”
In my view, CI/CD is best described as workflow automation. CI/CD doesn’t inherently describe a workflow itself but provides automation in a central location for a defined workflow to, well, flow. In our case this central location is GitHub, a website used to store the code you write and maintain a history of revisions you make. I won’t go into huge detail about GitHub since those of you reading this are probably familiar. CI/CD can be set up for code repositories on GitHub to automate the build, test, deployment, and other workflow activities anytime the code changes. This is particularly useful for creating a consistent build environment with clean workflow executions for each commit you make to your repository. For example, on a project at NASA, I have a CI/CD pipeline (automated workflow = pipeline) that will build 20+ bitfiles over the span of 40 hours when a new change is made to the repository. If I tried to do that manually, I’d simply perish. Whenever there’s a bug in the code (which happens a lot, surprise surprise), I can look back in my commit history and find builds at many different points in time to isolate where the bug first appeared. This saves hours of work and what little hair I have on my head (I’m bald, see Introduction).
Workflow automation sounds cool, right? Here’s the TL;DR: you have source code that you push to GitHub. GitHub takes your code and builds it, tests it, uploads the output, and deploys the build depending on how you’ve got your CI/CD pipeline set up. Once GitHub finishes executing the pipeline, you get a sweet green check-mark that floods the brain with serotonin. If the pipeline breaks, you get a sad red “x” along with a detailed stack trace and a looser grip on reality.
For more information, check out Github’s page on CI/CD:
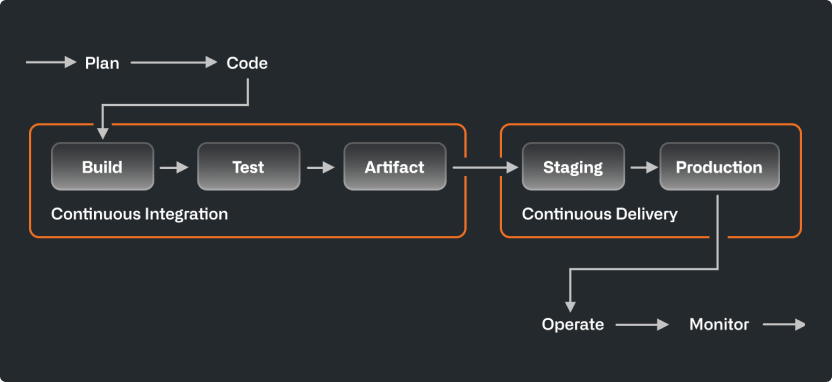
So why is this relevant to my fellow hardware engineers? I’ve found that this workflow automation works really well with FPGA development. My general workflow looks something like this:
Code –> Simulate –> Synthesize –> Implement –> Generate Reports –> Generate Bitstream –> Program Hardware
I’ve built a CI/CD pipeline integrated in GitHub to automatically perform these steps whenever I make a change to the code.
Here’s my setup:
- Windows 10
- WSL Version 2 – Ubuntu 24.04
- Vivado 2024.2
- Python 3.14
- Docker (+ dependencies in Dockerfile)
- Git
- Tailscale
The remainder of the blog post is going to be essentially a step-by-step setup guide since I don’t really know how else to talk about this.
Note: This is a demonstration of how CI/CD pipelines can be utilized for FPGA workflows. Security is always a concern! Please be cognizant of what you make publicly accessible if you decide to follow these steps, since some of these actions require root!
Windows Subsystem for Linux
First, I want a Linux environment since I’m familiar with the setup process for CI/CD in a Linux environment. I imagine you can do this in a Windows environment as well. Mac is also possible, but you will need to use Docker or some virtualization to do it and I’m betting the USB drivers for JTAG will be a pain in the butt.
Set up WSL2 with Ubuntu 24.04 (or 22.04):
Let’s get started with the installation of WSL using Windows Powershell.
> wsl --install -d Ubuntu-24.04You need to be using WSL Version 2. Version 1 will not work for this since the docker service requires the use of the system and service manager systemd to run, which is not supported in WSL 1. I had some big hiccups in my install with the Hyper-V virtualization drivers. If you have virtualization in both Windows and your BIOS enabled but you’re running into errors claiming those things are not enabled, you may have the same issue with Hyper-V I had. I ran these commands in powershell:
> bcdedit /set hypervisorlaunchtype auto
> shutdown /r /t 0
Hyper-V wasn’t loaded or wasn’t showing up as a Window’s Feature, but this seemed to do the trick!
Installing Vivado inside WSL:
I installed the Linux release of Vitis 2024.2, but we are only using the Vivado software for this particular example. You can install using batch mode in WSL.
Github Action Runner
Before we go any further, it’s a good idea to get the environment and user permissions set up to avoid banging our bald heads on the table until someone knocks on our doors out of concern for our health. I found the best method is to create a “runner” user on WSL where all the Github actions will take place. Here are the commands I used to create the account and set the proper permissions:
$ sudo groupadd --gid 1010 runner
$ sudo useradd --uid 1010 --gid 1010 -m -s /bin/bash runner
$ echo 'runner ALL=(ALL) NOPASSWD:ALL' | sudo tee /etc/sudoers.d/runner
$ sudo chmod 0440 /etc/sudoers.d/runner
$ sudo -u runner id
uid=1010(runner) gid=1010(runner) groups=1010(runner),989(docker)
I added runner to the sudoers group passwordless for convenience, but if your environment is not secure then you’ll probably want a password. Following this, I switched to the runner account for the remainder of the setup.
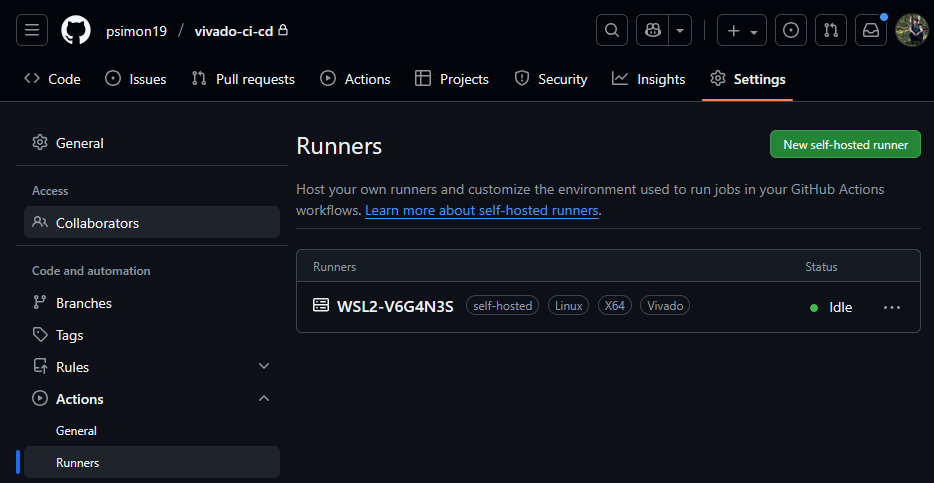
Next, I created my Github repository called vivado-ci-cd with a simple hello_world.py python script. On the repository page, select Settings -> Actions -> Runners and choose “New self-hosted runner”. Follow the instructions for installing the runner on the “runner” account in WSL (Linux).
Once the runner is in place, run it as a service using
$ sudo ./svc.sh install
$ sudo ./svc.sh start
On your runners’ page on Github, you should see your runner status change to “Idle”. This runner is specific to vivado-ci-cd only, but you can add general runners to groups of repositories.
I created a simple YAML Ain’t Markup Language (yaml) file to run hello_world.py using the new action runner we just created and huzzah! The pipeline passed and I was blessed with the glorious green check-mark. I saw less of the blessed check-mark as the project progressed, but for now we take the win. If any part of the pipeline returned an exit code 1 (error), the pipeline would fail.
Docker Setup
Next was building the docker image for the CI/CD pipeline to use. We use docker containers to ensure clean execution of the pipeline in a consistent environment with a clean copy of the code for each run.
M: “Ahh, a docking container for boats!”
P: “No no, not that kind of dock! A docker container is a portable and isolated lightweight operating system with everything you need to execute the code you want to run. The same container on different machines still contains all the same stuff for a clean and consistent way to build your code every time.”
M: “Yes, yes, for boats.”
P: “Think of it this way. Your operating system is a big theater building with several theaters that all put on the same show. Each theater (container) has its own stage, props, and actors, all determined by the play’s script (Dockerfile), while sharing the same theater building (host machine). The audience (users) don’t care about what’s going on in any of the other shows, but everyone’s watching the same show. If an actor slips on a banana peel that a rude audience member throws on stage in one theater, no other theater would know.”
There’s a few ways to install Docker for this setup. I decided to make life difficult and install it natively on WSL instead of through Docker Desktop. This is where I found out that WSL1 doesn’t work for this application. Docker works by running a daemon through systemd, which doesn’t exist on WSL1.
Once installed, I set up a Dockerfile for an environment that could perform Vivado simulation, synthesis, and implementation by including certain libraries Vivado needs. I found the dependencies through trial and error (lots of error). You can view that Dockerfile at my Github repository link for this project. Once the Dockerfile was good to go, I built using the command:
$ docker build -t vivado:2024.2 --build-arg UID=1010 --build-arg GID=1010 .And tested the image by running
$ sudo docker run -v /tools/Xilinx:/tools/Xilinx:ro -it --rm vivado:2024.2 bash
$ vivado -version
And badaboom! Our container is created! The -v argument is used to mount Vivado’s installation directory when I run the docker image so I don’t have to bake a fat 100+ GB directly into the image itself.
NOTE: I built the Docker image with the free license-less version of Vivado, but the steps you need to link a license file or a floating license URL on a server is fairly straight forward.
Example Vivado Project
The example project I created is dumb simple. I wanted to demonstrate a workflow, not a complicated project. That being said, I included IP, constraints, comma separated value (CSV) files for test vectors, and Verilog source to show many different tracked file types on git. So what does cool_mult_ex do? It takes in two 16-bit numbers, multiplies them in a 4-cycle pipelined multiplier IP,` and spits out a 32-bit number. Groundbreaking circuitry, I know.
Now I program exclusively in VHDL at NASA, so I thought to myself “let’s give Verilog a shot”. All I’ll say is this reg vs wire business is a full situation.
I also wrote a self-checking testbench.
M: “An exam for your muscles, no doubt!”
P: “Not that sort of bench! A testbench is a file written in Verilog, VHDL, etc., that instantiates and simulates the circuit that would normally be programmed onto hardware…”
M: “So strong..”
P: “… The testbench then stimulates inputs normally stimulated by hardware, like a clock, reset, and my two 16-bit inputs.”
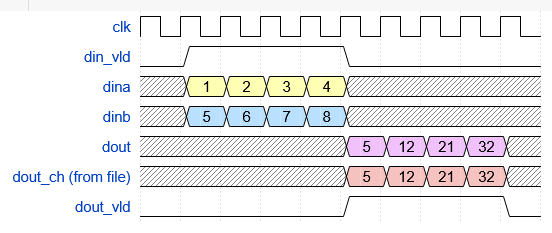
To make my testbench self-checking, I read the 16-bit inputs from a CSV file of 100,000 random signed input pairs generated from a test_vectors.py script that I (ChatGPT) wrote. That same test_vectors.py script also generates a file of 100,000 products of those two 16-bit inputs that I use in the testbench to verify the output of the multiplier module. Self-checking demands that your verification test vectors are absolutely correct, so Python’s multiplier operand better not let me down. Below is the timing diagram of the important stuff in the testbench.
Finally, I added a top-level wrapper file that connects clock, reset, LED, and switch pins from the BASYS3 board with some very simple logic to drive the two inputs from the switches and display the result on the LEDs. I have a BASYS3 master constraints file from the interwebs I added as well.
Vivado Tool Command Language (TCL) Scripts
Now the fun part. In order for this project to work I have to run all this junk headless.
M: “Chop chop baybee”
P: “No no! Headless means I don’t have a graphical user interface to work with! Just a boring old command prompt”
Luckily, Vivado’s GUI is really just an interface to TCL (pronounced “tickle”), so all the buttons I pressed and settings I configured for this example project I can theoretically plop into a script that I can run without ever opening Vivado’s GUI. And that’s what I did.
For this project, I separated out all the scripts into
create_prj.tcl – responsible for adding all the files, setting the top-level, setting the FPGA part, and creating the .xpr file used in all the subsequent steps. I made this as simple as possible, but there’s much more you can add to the script if you need to set any sim, synth, or implementation settings.
run_sim.tcl – responsible for running the simulation. Returns an exit code 1 if the simulation fails (the product from the multiplier and the product from the CSV don’t match) and exit code 0 if the simulation succeeds. This is important since Vivado won’t explicitly return exit code 1 in my implementation and its needed for the CI/CD pipeline to actually fail if the sim fails. VHDL or SystemVerilog may let you fail an assert statement and return exit code 1. I search for the text “SIMULATION FAILED” in the simulation.log file generated each time you run.
run_synth.tcl – responsible for synthesizing the project. The only gotcha here is be sure to reset_run for a clean start.
run_impl.tcl – responsible for implementing and generating the bitfile. Also resets the run at the start. After the build, I generate reports as an example of what you can generate and store as artifacts in CI/CD. You can add, delete, and modify any reports as you need. You could also generate checkpoints or whatever other artifacts you might want to keep, even the whole project if you really wanted.
program_fpga.tcl – responsible for programming the BASYS3 board, if attached. This file is hard-coded to my BASYS3 chip, but you could easily pass an argument with the target hardware to make the script generic.
To run all these scripts headless, I used the command:
$ vivado -mode batch -source <tcl script>Bug Alert!
I tested these (except for program_fpga.tcl) in the Docker image, and I found out that Vivado’s license check step in synthesis and implementation, which doesn’t matter for the free version, was probing udev when looking for a license. For the nerds, Vivado’s synthesis process crashed in my Docker environment because its licensing library (libXil_lmgr11.so) invoked libudev.so.1 for hardware enumeration, which failed without access to /dev or /sys. I stubbed libudev to /dev/null to safely disable hardware probing and resolve the segmentation fault. Unfortunately, this means no devices can be accessed via my image. You can mount /dev and /sys, but I wasn’t sure about the security implications so I avoided it. Womp womp, but I had a galaxy brain solution I’ll share a bit later.
Bringing It All Together
We’ve got WSL. We’ve got Docker. We’ve got the overly-complicated multiplier circuit that no one cares about. We’ve got the Github Actions Runner. All we have to do is put these ingredients together and call it a soup, right?
Wrong. This is where my ultimate suffering began.
Actually, to say this is where my suffering began is a bit generous. In fact, I’ve been suffering this whole time. I put this project together in pieces as I went and iterated several times as things would go wrong. I’m not trying to steer anyone else in my wild goose chase, so I’ve presented most of these sections as the final product.
First, let’s deal with the docker container. My goofy past did all this work with the docker container executed as a run step instead of setting the entire CI/CD job to use the container.
I did this initially because I was too lazy to add my image to my GitHub Container Registry (GHCR) and have the pipeline pull from there instead of from my locally created container. This was dumb. Once I had the image built with the proper permissions to run on the “runner” account and pushed up to ghcr.io (how to push a package to the registry) I was able to run the rest of my pipeline in the container.
Embarrassingly, you’ll see most of my commit history is running the container in the pipeline, but not actually running any of the other commands inside that container. Lol.
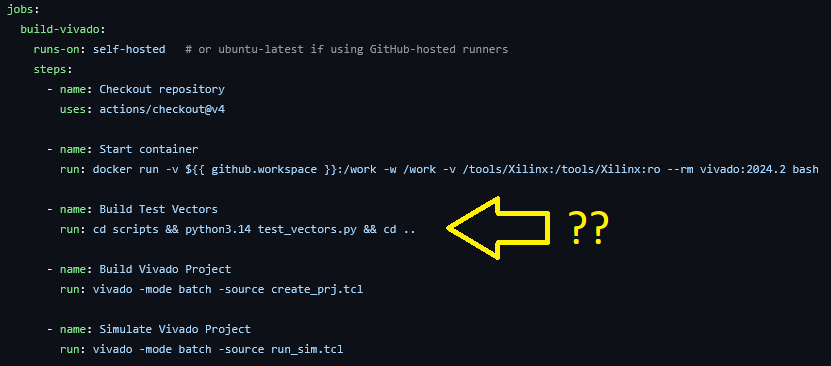
For the Vivado project, I did this in sections starting with simulation, then synthesis and implementation, and finally programming the FPGA. You can follow along in my main.yml file on the project page. For synthesis, I set up the runs to first execute the test_vectors.py file and generate the input CSVs. I then run the run_sim.tcl script and pass or fail the simulation. I purposefully pushed some commits with an error in the test_vectors.py script to induce a mismatch and stop the pipeline, which is where I learned about the exit code 1 requirement.
From there, I have steps to run run_synth.tcl, run_impl.tcl, and push up the bitfile + generated reports as artifacts to Github. I don’t have an expiry on those artifacts, but I strongly recommend you do. For my pipeline at work, I will easily hit 10+ GB with a couple of runs, which gets me yelled at by the Gitlab management team.
I added a step at the very end to clean the workspace like so:
$ rm -rf vivado-ci-cdsince the project folder is not automatically removed by the runner at the conclusion of the pipeline.
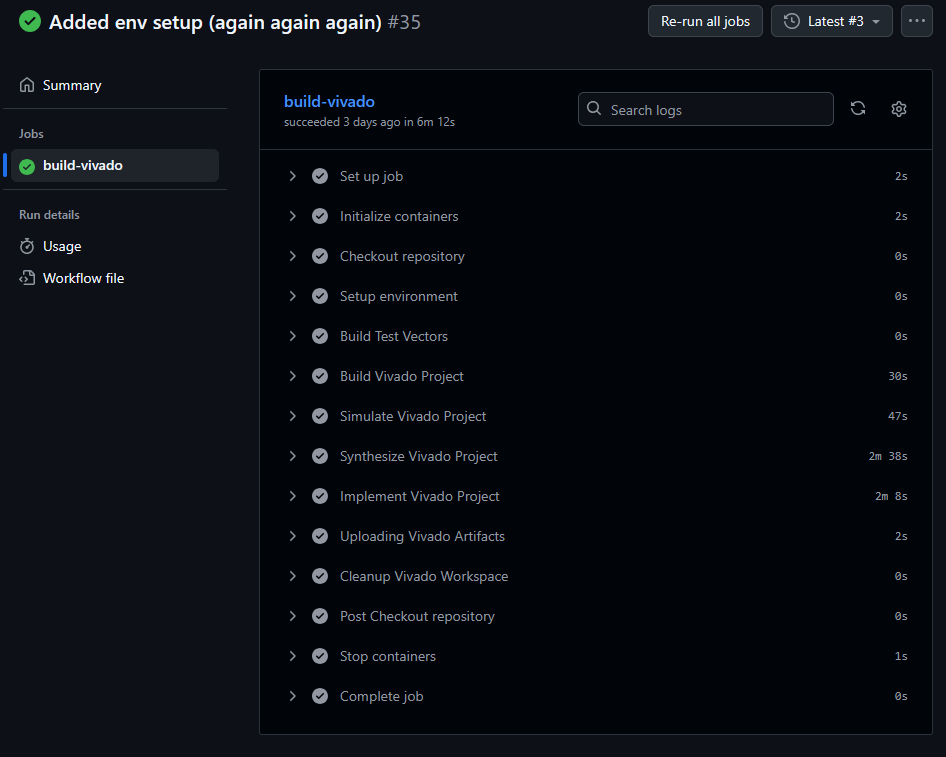
So far so good. Below is the single-job workflow for our example project.
Deployment to the FPGA
The final step in this process was deploying to the physical BASYS3 board connected to my runner. Surprise surprise, I had some trouble with this one. First, I tried to use USBIPD to run USB-over-IP with WSL and access the physical USB device from within WSL. I’ll spare you the details, but WSL critically failed after install and I gave up on trying to make that work.
Next, I tried to run the Vivado hardware server from Windows and have WSL access that hardware server over the WSL Ethernet adapter. That failed spectacularly, too. My firewall was killing my connection to WSL from Windows. I could ping Windows from WSL if I opened up the firewall, but I didn’t want my solution to this problem to require disabling Window’s firewall. I tried allowing traffic on the hardware server port 3121 alone through the firewall, but I couldn’t get it right.
Next attempt was to set up a hardware server on a Raspberry Pi.
M: “She’s my Raspberry Pi, cool drink of water, such a sweet surprise —”
P: “Love the enthusiasm, Warrant, but I wouldn’t eat this pie.”
I had a Pi 5 set up and everything was going great until I realized that Vivado can’t be built on an ARM chipset, so I had to try to build it in an x86 docker image and emulate using QEMU, which started to become a huge headache. I gave up.
At this point I’ve been flinging anything and everything at the wall until something stuck. Fortunately, I learned a lot during this process. One thing I learned was how to securely communicate with my Raspberry Pi over Tailscale, which got me thinking, “what if I used Tailscale to connect my WSL and Windows environments as two separate nodes, and then use the Tailscale virtual private network to connect to the Window’s hardware server?”
It’s brilliant! And it worked. Once Tailscale is set up (extremely easy), I used the Tailscale IP of Windows when connecting to the hardware server in WSL, and it worked like a charm. I added that IP as a Github secret, and I was able to add an FPGA programming job to the pipeline.
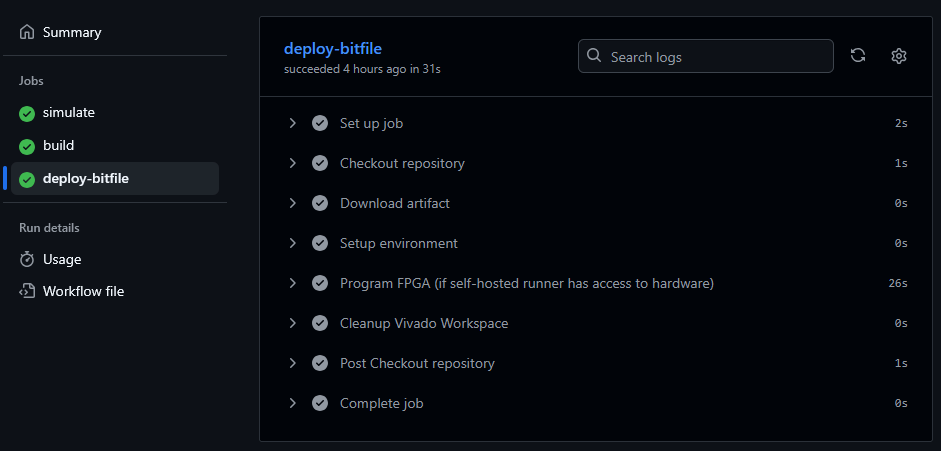
To finish up, I separated simulation, synthesis & implementation, and deploying to the FPGA as three separate test, build, and deploy jobs on the same pipeline. Take a look.
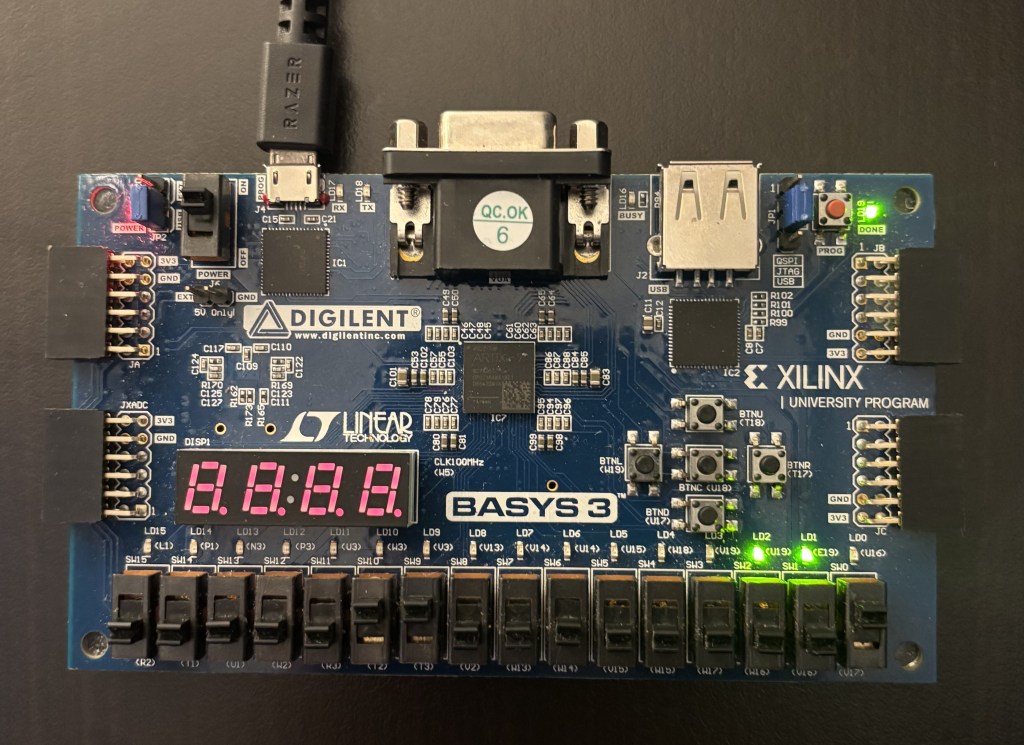
I verified on the physical BASYS3 board that everything worked as expected. Awesome! Look at me multiply two numbers after I ran my pipeline!
Security
I set up all this with pretty minimal security since I’ve privately hosted my repository. By the time you all see this, I will have removed the runner and its registry from Github so it will not be publicly accessible. However, security is a definite concern when executing docker images with root access since the user would theoretically have access to your Docker socket and subsequently your host system. That’s not ideal. What steps could we take then to improve the security of our pipeline? Here are a few ideas:
- Use non-privileged containers:
Avoid running Docker containers as root; configure the container to use a dedicated non-root user for Vivado processes. - Isolate build environments:
Execute pipelines in ephemeral containers or GitHub-hosted runners to prevent persistent access to the host filesystem and Docker socket. - Network segmentation:
Disable outbound internet access during synthesis/implementation stages to prevent data exfiltration or dependency hijacking. - Limit secrets exposure:
Use GitHub’s encrypted Secrets store for any license server tokens or SSH keys. Never hardcode credentials in YAML or Dockerfiles. - Harden WSL and Docker daemons:
Disable TCP Docker socket exposure (/var/run/docker.sock) and enforce TLS if remote connections are required. - Restrict repository actions:
Limit workflow triggers to specific branches (e.g., main, release/*) and disable workflow execution from forked pull requests. - Apply least-privilege principles:
Grant repository and runner permissions only as needed (e.g., “read-only” for most jobs, “write” only for artifact upload). - Validate inputs and artifacts:
Use checksum validation for uploaded bitstreams and scripts to ensure build integrity across runs. - Regularly rebuild base images:
Periodically rebuild Docker images from trusted sources to mitigate vulnerabilities from stale or outdated packages. - Monitor and log pipeline events:
Enable GitHub’s audit logs and maintain local logs for build, runner, and container activity to detect anomalous behavior. - Disable unneeded services in containers:
Ensure systemd and SSH daemons are disabled or masked in Docker images used for CI/CD. - Secure build artifacts:
Encrypt and expire stored artifacts (bitfiles, reports) to limit exposure and control repository storage growth.
If anyone has any other ideas, please let me know!
Final Thoughts
First, we could use a Github-hosted runner if we bake the Vivado binaries into the docker container we create at host on GHCR. This would greatly improve security and remove the need to self-host the runner at the expense of a 100+ GB docker image. The legality of doing that is also dubious, so that image would need to stay private for approved AMD users.
Also, in a future blog post I will show how to integrate generative AI as an automated reviewer of the code with the reports. Please follow so you won’t miss those updates!
This is just a template for a simple FPGA workflow using Vivado with CI/CD. We were able to simulate, synthesize, implement, generate reports, and program an FPGA with a simple click of a button. I’d love to hear your HDL workflows and improvements on what I’ve written about here. The sky is the limit when it comes to CI/CD, and being primarily a hardware engineer, I’ve got a lot to learn.
Thank you for reading,
Peter

Leave a comment